Installing the prerequisites
In this file you'll find instructions on how to install the tools we'll use during the workshop.
All of these tools are available for Linux, macOS and Windows users. We'll need these tools to write and compile our Rust code.
Important: these instructions are to be followed at home, before the start of the workshop. If you have any problems with installation, contact the team! Ruben and Thibaut will be happy to help you out.
Rust and Cargo: rustup
First we'll need rustc, the standard Rust compiler.
rustc is generally not invoked directly, but through cargo, the Rust package manager.
rustup takes care of installing rustc and cargo.
This part is easy: go to https://rustup.rs and follow the instructions. Please make sure you're installing the latest default toolchain.
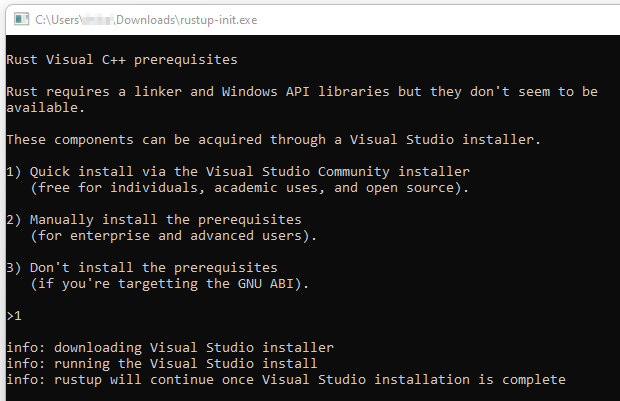
On Microsoft Windows, rustup might prompt you to install a linker.
Once done, you can run
rustc -V && cargo -V
The output should be something like this:
rustc 1.68.2 (9eb3afe9e 2023-03-27)
cargo 1.68.2 (6feb7c9cf 2023-03-26)
Visual Studio Code
During the workshop, we will use Visual Studio Code (vscode) to write code in. Of course, you're free to use your favorite editor, but if you encounter problems, you can't rely on support from us.
You can find the installation instructions here: https://code.visualstudio.com/.
We will install some plugins as well:
- The Rust-Analyzer
Installation instructions can be found here https://marketplace.visualstudio.com/items?itemName=rust-lang.rust-analyzer. Rust-Analyzer provides a lot of help during development and in indispensable when getting started with Rust.
- CodeLLDB
This plugin enables debugging Rust code from within vscode. You can find instructions here: https://marketplace.visualstudio.com/items?itemName=vadimcn.vscode-lldb.
More info:
Git
We will use Git to fetch the exercises. If you haven't installed Git already, you can find instructions here: https://git-scm.com/book/en/v2/Getting-Started-Installing-Git.
If you're new to Git, you'll also appreciate the following:
- GitHubs intro to Git https://docs.github.com/en/get-started/using-git/about-git
- Git intro with vscode, which you can find here: https://www.youtube.com/watch?v=i_23KUAEtUM
- More info: https://www.youtube.com/playlist?list=PLg7s6cbtAD15G8lNyoaYDuKZSKyJrgwB-
Workshop code
Now that everything is installed, you can clone the source code repository. The repository can be found here: https://gitlab.com/etrovub/smartnets/rustiec-101. If you're used to Git, you can clone the repository any way you like. Alternatively, you can use Visual Studio Code to clone the repository.
Cloning from within Visual Studio Code
You can clone the repository in Visual Studio Code itself.
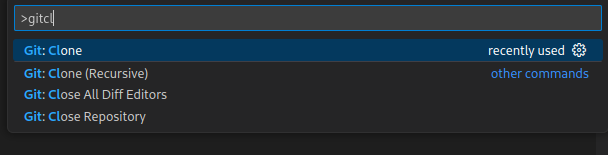
First, open the command panel (Control+Shift+P),
and type gitcl.
After confirming with Return, you can enter the repository URL https://gitlab.com/etrovub/smartnets/rustiec-101.

After confirming "Clone from URL" with Return, Visual Studio Code will ask a directory in which to clone the repository.
When asked whether to open the newly cloned workspace, you confirm.
Cloning the classical way
For those familiar to Git, you may opt to clone any way you like. Typically, this would involve the Git command line interface, like so:
git clone https://gitlab.com/etrovub/smartnets/rustiec-101
Github provides documentation about cloning repositories here: https://docs.github.com/en/get-started/getting-started-with-git/about-remote-repositories#cloning-with-https-urls
Trying it out
Now that you've got the code on your machine, navigate to it using your favorite terminal and run:
cd exercises/0-intro
cargo run
This command may take a while to run the first time, as Cargo will first fetch the crate index from the registry.
It will compile and run the intro package, which you can find in exercises/0-intro.
If everything goes well, you should see some output:
   Compiling intro v0.1.0 (/home/henkdieter/tg/edu/101-rs/exercises/0-intro)
    Finished dev [unoptimized + debuginfo] target(s) in 0.11s
     Running `target/debug/intro`
🦀 Hello, world! 🦀
You've successfully compiled and run your first Rust project!
If Rust-Analyzer is set up correctly, you can also click the '▶️ Run'-button that is shown in exercises/0-intro/src/main.rs.
With CodeLLDB installed correctly, you can also start a debug session by clicking 'Debug', right next to the '▶️ Run'-button.
Play a little with setting breakpoints by clicking on a line number, making a red circle appear and stepping over/into/out of functions using the controls.
You can view variable values by hovering over them while execution is paused, or by expanding the 'Local' view under 'Variables' in the left panel during a debug session.